
About Tags/Layers:
In essence, Tags/Layers enable you to name and group geometry together and turn the associated geometry off or on according to your preference.
A bit of history:
- In Sketchup 20 onwards, Layers are now called Tags. Seeing that Plusspec works all the way back to Sketchup 17; we call them Tags/Layer or Tags &/or layers.
- In Sketchup 21 upward Tags can now be added to folders which makes managing and viewing the right geometry at the right time so much easier.
- In all versions of PlusSpec beyond August 2022, all PlusSpec tools automate and place Tags/Layers into folders. This makes it easier & faster for you to control your Building Information Model (BIM) inside Sketchup.
Tags/Layers: Made Simple
PlusSpec comes with an automated library of tags/layers and now Tag folders. Everything you draw in PlusSpec will be automatically assigned to the correct tags/layers and be neatly placed inside a folder.
This is AWESOME! Why? Because Layers are key to controlling your 3D Model, your 2D drawings, and your Bill Of Materials (BOM).
Layers have two super important functions:
- They control each object so that you can edit and manipulate them easily. This includes the visibility of each object in your scenes/views (2D drawings). Note: PlusSpec automates scene creation too!
- They control the Take-off/BOM output.
Think of them as the way in which you control all of the information, as well as the visibility of everything you draw. This is the essence of ‘BIM’.
Although PlusSpec automates everything for you, you may need to create custom objects (with SketchUp) or create custom scenes/views. You will want to assign custom objects to the appropriate PlusSpec Layer so you can control your plans and/or BOM. You may also need to create custom layers (although this is rare).
Can I change the Layers/Tags names?
Yes, each tool gives you the ability to have a One-time Value or the ability to override the Tag/Layer name every time you use the plugin inside Sketchup.
Should I change default Layer names?
- If you are fully aware of how Sketchup Scenes organise Tags. Layer: yes
- If you are a beginner and you want your scenes to be automated: no
- You can change the Tag/layer name as a one-time value which means the next time you use the tool, it will go back to the default tags/layer set in the program
Can I change where the materials report inside the BOQ or Estimate by changing a Tag/Layer?
- Yes, however, in PlusDesignBuild, you also have categories that organise your material & component BOQ into commonly understood industry groups. For this reason (August 2022), we added the ability to change the Category and Tag of a selected product. This way, you can choose where you want that material to report inside the takeoff. NOTE this feature is not available in PlusArchitect or any other PlusSpec tool other than PlusDeisgnBuild
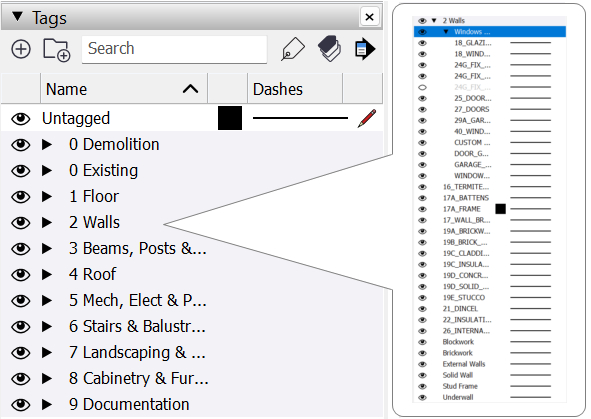
How Folders and Layers/Tags work
Folders contain Tags and Layers; this makes it super easy to control the visibility of walls, floors, roofs, landscaping, Cabinetry and Documentation.
Tag folders in PlusSpec also separate parts of a project. For example: if the project were a re-model/extension, certain parts of the project would be existing and certain parts of the project would be proposed, and certain parts will be demolished. You’ll be happy to know that these tag folders are also automated, helping you stay organized!
Sketchup tag automation and organization via PlusSpec plugin/extension PlusArchitect PlusDesignBuild
There are two kinds of Layers in PlusSpec for SketchUp:
Parent Layers
These control all materials/build-ups that make a building component, such as a wall, roof, slab, etc.
Nested Layers
These are housed under the relevant Parent layer, and consist of the various materials/build-ups that make up a building component, such as a wall, roof, slab, etc.
Example
Let’s take a look at a Masonry Veneer wall.
The Parent layer is the WALL_GROUP, which binds the materials/build-up into what they all make when used together: a wall.
However, there are multiple nested layers that make up this wall. For example, there is the brick/block material, which is held on the 19A_BRICKWORK layer. However, you may have also specified masonry hardware, which is held on the 19B_BRICK HARDWARE layer. There is also the timber/lumber frame, held on the 17A_FRAME layer. The internal finish (wall lining) is held on the 26_INTERNAL_FINISH layer, and the insulation is held on the STUD FRAME – 22_INSULATION layer. Depending on what materials you have chosen to specify, the list may go on.
Can Tags and Tag folders be utilized to control 2D documentation in Layout?
Yes, In Layout 2021 and above Tags and Tag folders can be turned on or off inside Layout; this saves so much time when in the documentation phase as essentially, you can override the visibility of certain objects without going back to Sketchup and editing scenes and tag visibility.
What’s the deal with the numbers?
The numbering system is generic, and roughly represent a build sequence. In other words, the lower numbers will generally be the first items that will be ordered/built, and the higher numbers will be the last.
For example: you would typically start ordering/building a project with the engineering, site setup and slab/joist. You then move on to walls, etc. However, this is a rough guide only.
If a layer doesn’t have a number, it is likely a Parent layer or standalone layer. These layers will not form part of your Take-off/BOM (although there are a couple of exceptions to this rule).
The best way to learn
The best way to understand the PlusSpec for SketchUp Layering system is to have your ‘Entity Info’ and ‘Layers’ trays open at all times.
If you left click on a building component/object (such as a wall), you will see the Parent Layer displayed in the Entity Info. If you keep double-clicking into the object, you will see that each material/build-up is nested on their respective layers.
PlusSpec Layers Breakdown
12_ENGINEERING
This is the layer for all components (steel columns & beams) in the Structural Steel category of the Component Tool.
13_SITE_SETUP
This is the layer for all components in the Site category of the Component Tool.
16_SLAB
This is the layer for the content materials (concrete by default) in the Slab & Footing Tools.
16_TERMITE_BARRIER
This is the layer for the underwall & underslab protection materials (termite barrier or membrane) in the Wall & Slab Tools.
17A_FRAME
This is the layer for the structural wall framing materials (studs & top plates) in the Wall Tool.
17B_ROOF_FRAME
This is the layer for the structural roof framing materials (only rafters at the moment) in the Rafter Tool.
17C_ROOF_TRUSSES
This is the layer for the structural roof trusses in the Roof Truss Tool.
17_BEAMS/PLATES
This is the layer for the plate materials in the Timber/Lumber Plates category of the Beam Tool..
17_FLOORING
This is the layer for the flooring materials (ply/sheet flooring) in the Ceiling & Floor Joist Tools. It is also the group layer for the Floor Tool.
17_FLOOR_TRUSS
This is the layer for the structural floor truss materials in the Ceiling & Floor Joist Tools.
17_JOIST
This is the layer for the structural joist materials (solid timber/lumber & LVL) in the Ceiling & Floor Joist Tools.
17_STEEL_BEAMS
This is the layer for the structural steel beam materials in the Ceiling, Floor Joist & Beam Tools.
18_GLAZING
This is the layer for the glazing materials (glass) in the Window & Door Tools (where glass is used).
18_WINDOWS
This is the layer for the window and metal/aluminium door components in the Window & Door Tools.
19A_BRICKWORK
This is the layer for the masonry materials (brick, block, etc) in the Wall Tool. Note: This is only for the face that the material is applied to and not the wall skin/block.
19B_BRICK_HARDWARE
This is the layer for the masonry hardware materials (otherside of masonry walls) in the Wall Tool and steel lintels for windows & doors. Note: This is only for the face that the material is applied to and not the wall skin/block.
19C_CLADDING
This is the layer for the cladding materials in the Wall & Hip Roof Tools (gable & dutch gable). Note: This is only for the face that the material is applied to and not the wall skin/block.
19C_INSULATED_CLADDING
This is the layer for the insulated cladding materials (EPS/XPS) in the Wall Tool. Note: This is only for the face that the material is applied to and not the wall skin/block.
19D_CONCRETE_WALL
This is the layer for the Solid Wall content materials (concrete) in the Wall Tool. If materials are created from the concrete material (as a template) they will use this layer.
19D_SOLID_WALL
This is the layer for the Solid Wall content materials (CLT) in the Wall Tool. If materials are created from the CLT material (as a template) they will use this layer.
19E_STUCCO
This is the layer for the Lightweight Multi-Skin Wall external materials (render/stucco) in the Wall Tool. Note: This is only for the face that the material is applied to and not the wall skin/block.
1_PlusSpec Snapshot
This is the layer for the 2D map screenshot/image imported from the Solar North Tools.
1_PlusSpec Terrain
This is the layer for the 3D map screenshot/image imported from the Solar North Tools.
20A_PLUMBING_ITEMS
This is the layer for all components (steel columns & beams) in the Plumbing category of the Component Tool. It is also the layer for plumbing components from the BIMBits 3D Model Library.
20B_PLUMBING_PENETRATIONS
This is the layer for all components (steel columns & beams) in the Plumbing category of the Component Tool that have a penetration through either walls or floor (e.g. slab or joist). This will only be a circle to show where the penetration will be.
21_CAPPING
This is the layer for the capping materials (metal, tile & slate/shingles) in the Hip Roof Tool.
21_DINCEL
This is the layer for the Dincel products/profiles in the Dincel Wall Tool.
21_EAVES
This is the layer for the eave/soffit materials in the Hip & Skillion Roofs Tools.
21_FASCIA
This is the layer for the fascia materials (metal/aluminium or timber) in the Hip & Skillion Roofs Tools.
21_GUTTER
This is the layer for the gutter materials in the Hip & Skillion Roofs Tools.
21_ROOF
This is the layer for the roofing materials (metal, tile & slate/shingles) in the Hip & Skillion Roofs Tools.
21_ROOF_SHEATHING
This is the layer for the sheathing materials (plyboard or OSB) in the Hip & Skillion Roofs Tools.
21_ROOF_WATERPROOF
This is the layer for the waterproofing materials in the Hip & Skillion Roofs Tools.
22_CEILING_INSULATION
This is the layer for the ceiling insulation materials in the Hip & Skillion Roofs Tools.
22_INSULATION
This is the layer for the insulation materials in the Wall Tool.
23_ELECTRICAL/APPLIANCES
This is the layer for all components (powerpoints/GPO’s, switches, lights, fans, TV’s, fridges, etc) in the Electrical category of the Component Tool. It is also the layer for electrical & appliance components from the BIMBits 3D Model Library.
24E_STAIRS
This is the layer for all stairs components in the Stair Tool.
24F_KITCHEN_CABINETRY
This is the layer for all components (kitchen & laundry) in the Cabinetry category of the Component Tool. It is also the layer for cabinetry components from the BIMBits 3D Model Library.
24G_FIX_OUT
This is the layer for the swinging door panels/leaf (not glass) in the Door Tool.
24G_FIX_OUT_A
This is the layer for the window & door fixout components (reveals & architraves) in the Window & Door Tools. This layer is for the presentation scenes after using the Scene Tool.
24G_FIX_OUT_B
This is the layer for the window & door fixout components (reveals & architraves) in the Window & Door Tools. This layer is for the floor & section plan scenes after using the Scene Tool.
25_DOOR_FURNITURE
This is the layer for the door furniture/hardware components (handles, hinges, etc) in the Door Tools.
26_INTERNAL_FINISHES
This is the layer for the internal finishes materials (plasterboard, tiles, wall linings, etc) in the Wall & Wall Surface Tools. This layer is turned off by default until scenes have been created using the Scene Tool.
27_DOORS
This is the layer for the internal and external swinging door components in the Door Tool.
29A_GARAGE_DOORS
This is the layer for the garage door (roller & panel) components in the Door Tool.
29_FLOOR_FINISH
This is the layer for the sheathing materials (floorboards, carpet, etc) in the Floor Tool.
32_BALUSTRADE
This is the layer for components (posts, rails, wire, etc) in the Handrail Tool.
32_EXTERNAL_LANDSCAPING
This is the layer for all components (entry gates, pools, retaining walls, hedges, etc) in the Landscaping category of the Component Tool.
33_FURNITURE
This is the layer for all components (bed, chairs, tables, etc) in the Furniture category of the Component Tool. It is also the layer for furniture components from the BIMBits 3D Model Library.
40_WINDOW_TINTING
This is the layer for the aftermarket glass tinting materials (for windows & doors) in the Window & Door Tools.
Allowances
This is the layer for the Frame Hardware component in the Ancillaries category of the Component Tool.
Ancillaries
This is the layer for the Frame Hardware component in the Ancillaries category of the Component Tool.
Awnings
This is the layer for the awning components in the Awnings category of the Component Tool.
BALUSTRADE_GROUP
This is the parent/top layer of the Handrail Tool.
BEAMS_GROUP
This is the parent/top layer of the Beam Tool.
Blockwork
This is the layer for the masonry skins of the Wall Tool. This layer is used with the Section Tool.
Brickwork
This is the layer for the masonry skins of the Wall Tool. This layer is used with the Section Tool.
CEILING_JOIST_GROUP
This is the parent/top layer of the Ceiling Joist Tool.
DEMO
This is the layer for all the contents tagged in the dialogs as ‘Demolition’.
Electrical Symbols
This is the layer for all symbol components for electrical & appliance components in the Electrical category of the Component Tool. It is also the layer for electrical & appliance components from the BIMBits 3D Model Library.
Elevations
This is the layer for window and door opening/moving direction symbols (which can be changes in the Settings Tool) for the elevation plans.
Floor Plan A
This is the layer for the door swing and garage door symbols.
Floor Plan B
This is the layer for all door openings. It is turned off by default but is used for the black & white floor plans scenes.
FLOOR_GROUP
This is the parent/top layer of the Floor Tool.
FLOOR_JOIST_GROUP
This is the parent/top layer of the Floor Joist Tool.
Grids
This is the parent/top layer of the Grid Tool.
Hidden on Plan
This is the mitre symbol for the layers. This should be hidden
Hidden Wall Edges
This is the layer for the top & bottom edges/lines of the walls. It is turned off by default.
MEP_GROUP
This is the parent/top layer of the MEP Tools.
Plan
This is the text (eg Room name and m2/ft2) that is created with the Space Tool (Room Quantities).
POST_GROUP
This is the parent/top layer of the Post/Column Tool.
Roof Plan
This is the layer for the 2D roof plans of the Hip & Skillion Roof Tools.
ROOF_FRAMING
This is the parent/top layer of the Rafter Tool.
ROOF_GROUP
This is the parent/top layer of the Hip & Skillion Roof Tools.
ROOF_TRUSS_GROUP
This is the parent/top layer of the Truss Tool.
Room/Area/Volume
This is the layer for the rooms area & volume of the Room Quantities Tool.
ROOM_QUANTITIES_GROUP
This is the parent/top layer of the Room Quantities Tool.
Section – Electrical Plan 1
This is the layer for the section plane for the Electrical Plan 1 scene.
Section – Electrical Plan 2
This is the layer for the section plane for the Electrical Plan 2 scene.
Section – Floor Plan 1
This is the layer for the section plane for the Floor Plan 1 scene.
Section – Floor Plan 2
This is the layer for the section plane for the Floor Plan 2 scene.
Section – Section A
This is the layer for the section plane for the Section A scene.
Section – Section B
This is the layer for the section plane for the Section B scene.
SECTION_HATCHING
This is the parent/top layer of the Section Tool.
SLAB_GROUP
This is the parent/top layer of the Slab & Footing Tools.
Solid Wall
This is the layer for the Solid Wall concrete skins of the Wall Tool. This layer is used with the Section Tool.
Stair Space
This is the layer for the head height and space of the Stair Tool. This helps with creating voids for stairs.
STAIR_GROUP
This is the parent/top layer of the Stair Tool.
Stud Frame
This is the layer for the frame skins of the Wall Tool. This layer is used with the Section Tool.
Tags
This is the parent/top layer of the Tag Tool.
WALL_GROUP
This is the parent/top layer of the Wall Tool.
Leave a Reply
You must be logged in to post a comment.